

Disintegrators are powerful destruction units that will require some attention and planning for installation compared to normal small shredding devices. When considering purchasing a SEM disintegrator we will be there every step of the way to ensure that all conditions are being met. That being said, here are some things that you’ll want to consider ahead of time:
LOCATION: Where the system is to be deployed is important and should normally be in a 1st floor warehouse type environment with ample space, wide door access, and a loading dock. The smallest systems will require a minimum of 11’ x 11’ with an 8’ 4” ceiling. SEM can provide a disintegerator floor plan drawing on request.
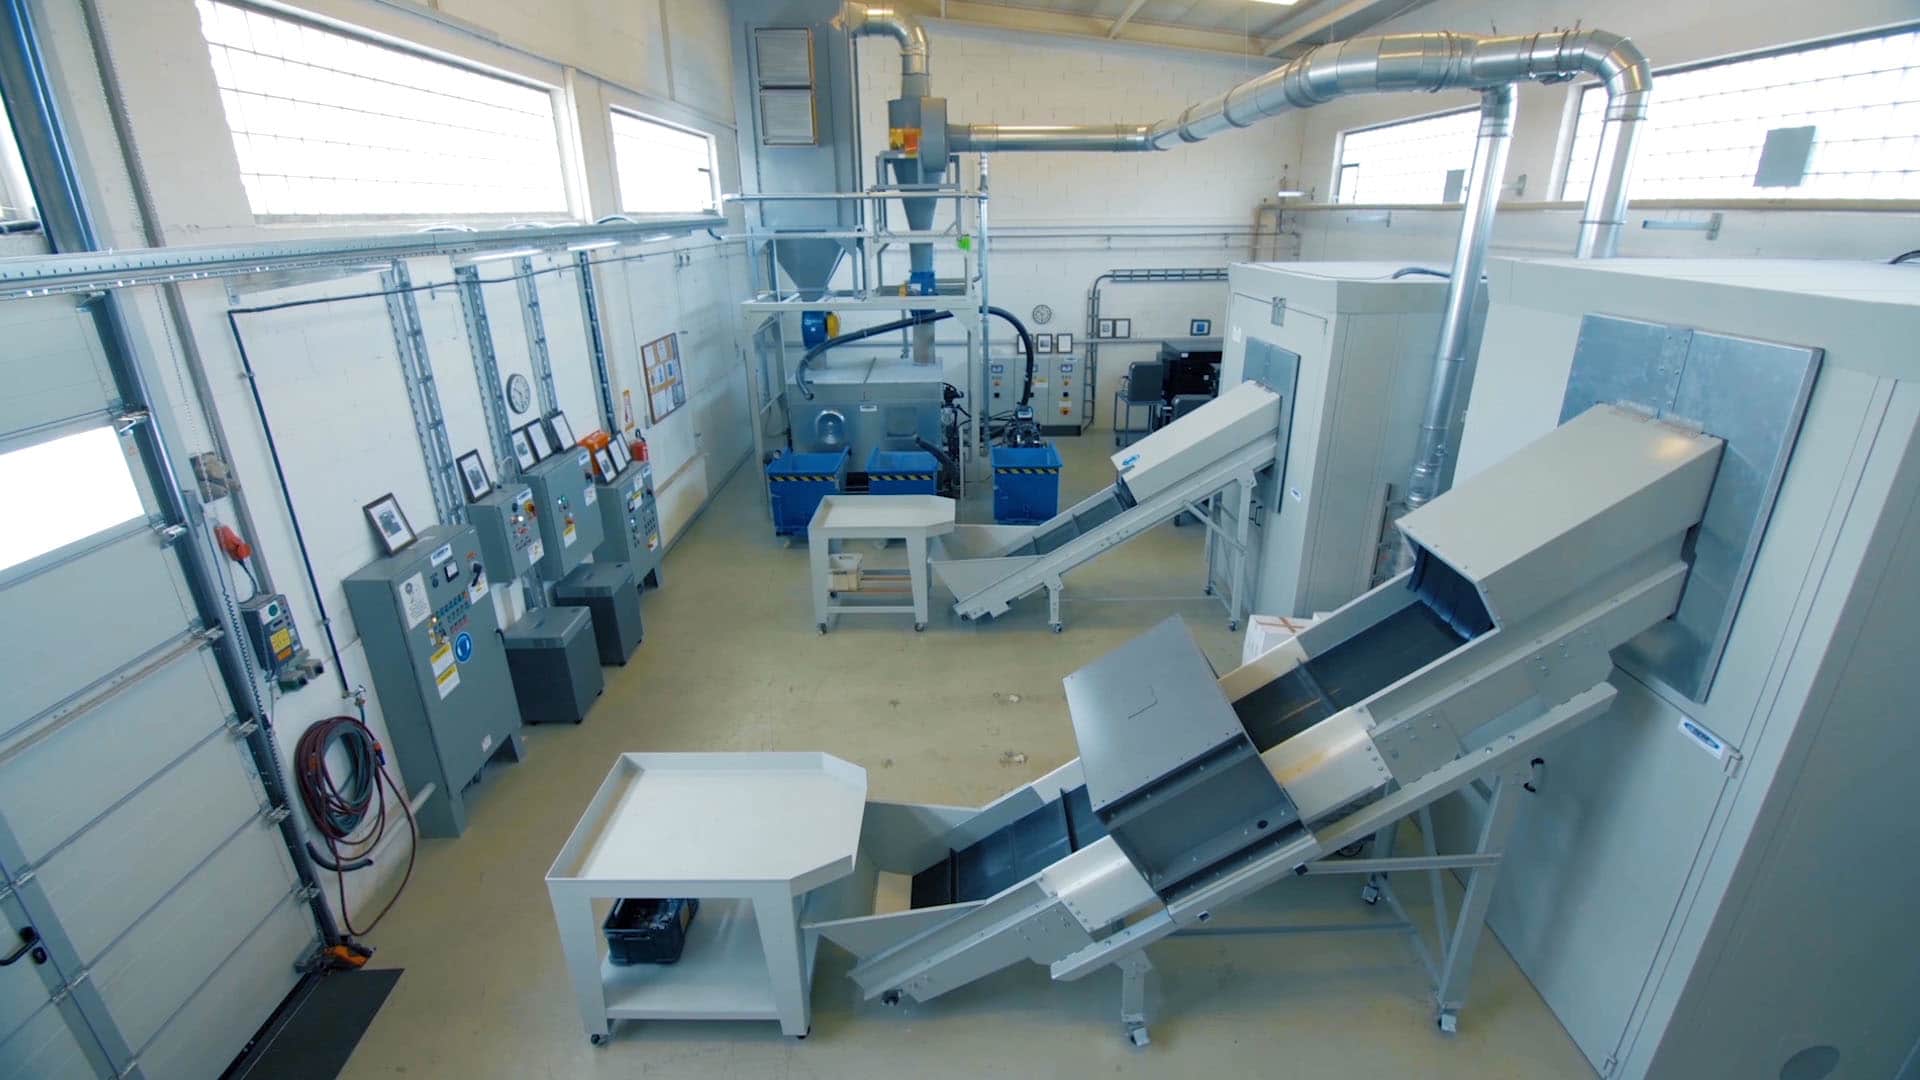
Make sure you have a minimum of three feet around the system to allow for easy access and future maintenance of the equipment. Positioning near the loading dock with dumpsters or compactors will make disposal of the waste bags much easier. In larger systems where an outside waste system is deployed as shown here, the location of the system close to the outside collection is important. Wall coring and the potentially pouring of concrete pads outside to mount filters and air system support stands may also be required for larger systems.
POWER: The facility must have access to 3-phase power (460V, 208V
or 230V / 60Hz) with proper amperage to power the equipment. The
breaker box to be located within 10 feet of where the equipment will
be installed.
NOISE: Remember, disintegrators are industrial pieces of equipment. They are loud. You will need to determine the impact on employees in close proximity to the equipment. Consider operating the equipment during non-business hours or purchase a SEM sound enclosure that will dramatically reduce noise levels.
DUST: Because disintegrators cut the paper to such a small particle, it is inevitable that some dust will be created, so make sure that your space is suitable for this. With advanced evacuation/filter systems, briquettors and sound enclosures, much of the dust can be captured. However, when bags are emptied some of it is bound to escape. There is no such thing as a dust-proof disintegrator!
WHEN TO INSTALL: Disintegrators can take anywhere from two to five days to install. How will installation and temporary disruption effect your operation? It’s important to plan ahead.
OPERATOR TRAINING: Think through how you intend to use the machine. Will you have dedicated operators who are responsible for feeding and maintaining the machine, or will you expect to give the key to whoever needs to shred, even though they may have never used a disintegrator before? If your answer is the latter, I would suggest you reconsider, or make sure there is some form of supervision/training for your new users.
What Should I Expect At Time of Installation?
- In most cases you will be required to receive, store and protect the equipment until the installation team arrives. Storing it in the installation space and out of the weather is ideal.
- Make sure installation space is clean and power disconnects are in and ready.
- Have a fork truck capable of moving equipment into the install site and aerial-lift if necessary.
- You will need to have your licensed electrician present during the installation for electrical connections as well as interconnecting wiring and material.
- You should have a dumpster close by so the install team can deposit the crating materials and waste from the install to keep the site clean.
- Make sure you have an adequate amount of paper; at least a few hundred pounds to train your staff and test the equipment.
- Once the installation and testing are complete, the training of your staff on the operation and daily maintenance will be done. An installation manual for your equipment will be provided.
What You Should Expect From A Qualified Installer:
- The installer should supply a Workers Protection Plan. The plan will designate a competent person responsible for all facets of the installation. The plan will provide details of the vendor’s safety program. This will include items like work rules, safety training, and accident reporting.
- The installer will indicate whether they are ISO14001 compliant and provide a copy of their Environmental Management System (EMS) Manual.
- The installer should supply mechanical and electrical drawings illustrating how their equipment will fit into the space required.
- The installer will provide proof of Liability Insurance with at least $1,000,000.00 in coverage.
- Sustainability is important
Scheduled routine preventative maintenance on your disintegrator is highly recommended and will also help keep the disintegrator running well, protect your warranty, and with regular service will also help to reduce dust and noise levels. Learn more here.
Hopefully, this guide will help you know what to expect so you can get prepared and have a very smooth disintegrator installation, and you will be up and shredding in no time! For more information contact us at any time and we can guide you through the whole process. After all, we did make the worlds very first disintegrator!